


In the previous part, we successfully flashed DD-WRT on an Asus WL-520gU router. But my goal is to go beyond the standard firmware and install additional software on this router. To do that, I need to enable JFFS2, which basically transforms the remaining free area of the ROM into disk space, and enable USB support so I can plug in additional storage if needed.
To enable JFFS2, go to the Administration->Management tab and look for the JFFS2 Support section. Enable it and also enable Clean JFFS2. I think the "Clean" option is like a format. When you apply and/or reboot, the option will reset to disable which is where you will want to leave it. (It will look kind of like the screenshot above when you are done.)
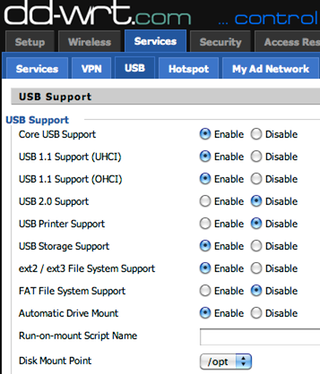
Next we need to enable USB. To enable USB, go to Services->USB.
Now I've read that there are a few caveats with the Asus WL-520gU concerning USB, but I don't know if these are still true today.
According to the documentation I found, the USB port on the router is technically 2.0, but only supports 1.1 transfer speeds (which is technically allowed by the 2.0 spec). This apparently caused some versions of the Linux USB 2.0 drivers to freak out and cause reboots or total router failures. I read additional bits and pieces implying this was fixed at some point, but I could not find explicit documentation stating it was okay to use the 2.0 drivers. I briefly did have 2.0 enabled at one point and it seemed to be working. But I don't want severe failures so I decided to disable USB 2.0.
I don't need printer support, so I disabled it. I have read that you can plug in a USB hub and have a printer there in addition to your storage devices so maybe you want to keep it on. (If you've seen elsewhere on my blog which I will later get into again, I already have a network capable printer connected directly by ethernet, so I don't need this. Though for those of you that do have USB printers, keep reading because the Zeroconf stuff will help you too.)
I need ext2/ext3 because I will be installing Linux oriented packages on my storage device. They use symbolic links so ext2 or ext3 is a must.
I disable FAT because I don't need it. I also discovered that my drive was automounting as the wrong file system type and defaulting to FAT. So rather than spend time trying to understand this, I just disabled it.
I set the mount point to /opt because I will be dealing with a packaging system called Optware later and all the documentation assumes /opt as the mount point.
Preparing a USB Flash Drive as Additional Storage
I have a USB Flash Drive I intend to use as my storage device. I like solid state and low power. For now at least, I don't intend to run this as a music, file, or torrent server like many other people seem to do, so I don't need lots speed or storage space.
Because it is a flash drive, I don't want to "wear out" the device by writing too much. I read that ext2 was recommended for this because the lack of journalling will help preserve the device. But I failed to notice that the Mini-USB firmware omits the ext2 driver. So I wasted a lot of time trying to figure out why my key would not mount. So make sure you format your drive with the correct file system based on the drivers included in your firmware.
DD-WRT doesn't have any format tools included so you will need to find something to help you format your drive. Since I also have a Linux machine, it's not a problem for me. With my Debian Lenny system, I plug in my key and the device happens to be at /dev/sda1, so I run (as root):
mkfs.ext3 /dev/sda1 # Dangerous! Make sure you know which device to use
Please know where your device is on your system or you may format the wrong disk and you will be very unhappy.
If you don't have a Linux system, you might try burning a Knoppix CD and boot it up on your machine to temporally run Linux. Knoppix is a stand-alone bootable/live-CD distribution of Linux.
Special Mount Options to Avoid Wearing-out Flash Memory
So now I have a USB flash drive in ext3. But as I said earlier, I don't want the drive to wear out. So there are two different things we can do. First, we can pass the noatime flag when mounting the disk. This avoids Linux from writing the last access time on files it has read. When reading files, Linux still writes information unless you set this flag.
Second, this is for later, but once I become satisfied with all my changes, I will mount the disk as read-only. This will ensure nothing gets written. As I said, I am not doing file server or bittorrent stuff, so read-only works for me.
So you don't have to hunt for it later, the command I will use is:
mount -f -r -o noatime,remount -t ext3 /dev/scsi/host0/bus0/target0/lun0/part1 /opt
The -f is a force switch. I noticed sometimes my command was ignored.
The -r is for read-only.
-o starts a list of options
noatime is the first option
remount is the second option. I remount because the drive was already automounted. Alternatively, I could have run two commands (unmount and mount without the remount option).
-t ext3 specifies the file system type. It should generally autodetect so this may not be necessary, but as I said earlier, when I had FAT enabled, it was not mounting the way I expected.
/dev/scsi/host0/bus0/target0/lun0/part1 happens to be the device path of my drive on my router.
/opt is the mount point.
I put this in a script called start_optware_drive.startup in /jffs/etc/config
I also make it executable:
chmod +x /jffs/etc/config/start_optware_drive.startup
DD-WRT has built-in some special conventions. Any executable script that ends in .startup in /jffs/etc/config will be run on startup. So this remount will run every time my device boots up. This always seems to get run after DD-WRT automounts my drive assuming I always leave the drive plugged in (which I do). If you have an actual hard disk that needs to spin up, you may want to add a "sleep 5" or something to give some time for the disk to spin up before you try to remount it.
See these links for more information on startup scripts.
http://www.dd-wrt.com/wiki/index.php/Script_Execution
http://www.dd-wrt.com/wiki/index.php/Startup_Scripts
Now when your router boots up, the drive will be remounted with the new settings. To verify this, you can run the mount command to see the status of the mounted partitions. It should look something like the following:
/dev/discs/disc0/part1 on /opt type ext3 (ro,noatime)
(Please remember to wait to set the read-only parameter after we are done if you are following along. Otherwise you won't be able to make changes unless you remount the disk as read-write.)
Next time, we are going to install Avahi (an implementation of Zeroconf). Things are going to get ugly, but the results will be cool.
Links:
Part 2: Picking a Firmware & Initial Flashing (previous)
Part 4: Zeroconf should be available on all network devices, including routers (next)